Everything you need to run a single Kubernetes pod

OK, as promised last week, this post is a follow-on to my previous write-up about running a single-node Kubernetes cluster at ACRL. After calling the post “hot garbage”, the redditor who commented on that post went on to say that he was hoping for more details and less high-level pish-tosh1. So, random redditor, this 4000-word manuscript is for you! I hope you brought your coffee.
Project Goals: Quick Recap
Before we dive into all the arrows in the architecture diagram, I just wanted to quickly review what the goals of this project are:
- Run a Kubernetes cluster in the cloud,
- as cheaply as possible,
- and schedule a workload on it. Lastly,
- it should be one command to completely destroy and recreate our entire stack if we need to.
To recap what I discussed in the previous post, we’re running k3s on a single AWS EC2 spot instance. We’re not using EKS, a) because it’s expensive, and b) because we’re supposed to Kubernetes experts over here and not just some random hack jobs, so we should probably have some expertise running Kubernetes. We’re running on a spot instance a) because it’s cheap, and b) because I wanted to know if it could be done. If you’re following along at home and you’re not running on a spot instance, you can probably do away with a lot of this complexity; but on the flip side, running on spot serves as a forcing function to build the automation and tooling to easily recreate your entire state from scratch, which is in my experience an extremely underrated superpower.
In my previous post, we got to the point of “having a running k3s node”, but we didn’t actually get to the point of “running a workload on it”, partly because I ran out of time, and partly because I thought that once I had the node up and running, running the pods would be easy. It’s just YAML, right2???
Anyways, in the last post we also didn’t define what workload we’re going to be running on our Kubernetes cluster. I have quite a few things I eventually want to run, but my first goal was just to run a simple XMPP server. I’ve wanted a good internal “chat” solution for a while, I really don’t want to use Slack or Discord, and it turns out that XMPP has been living a healthy thriving life for the past 15 years, even if most people don’t realize it. So after a bit of research, I decided that I was going to get Prosody running inside my Kubernetes cluster. It’s small and lightweight enough that “configuring Prosody” wouldn’t take too long, but it would also exercise a bunch of features that I’m going to want later: specifically, ingress, certificates, and persistent data.
I also also didn’t explicitly discuss the fourth goal in my last post, but this is really important to me. I’m a very big proponent of the “GitOps” pattern3. If you can check in your desired infrastructure state into version control, and it’s easy to recreate and/or get back to a “known good configuration”, that makes everything so much easier down the line. So for me at least, it’s worth it to spend some more time up front doing things “right” to (hopefully) make my life a little easier in the future4.
So with that said, let’s go into the nitty-gritty details.
Revisiting Middle-earth
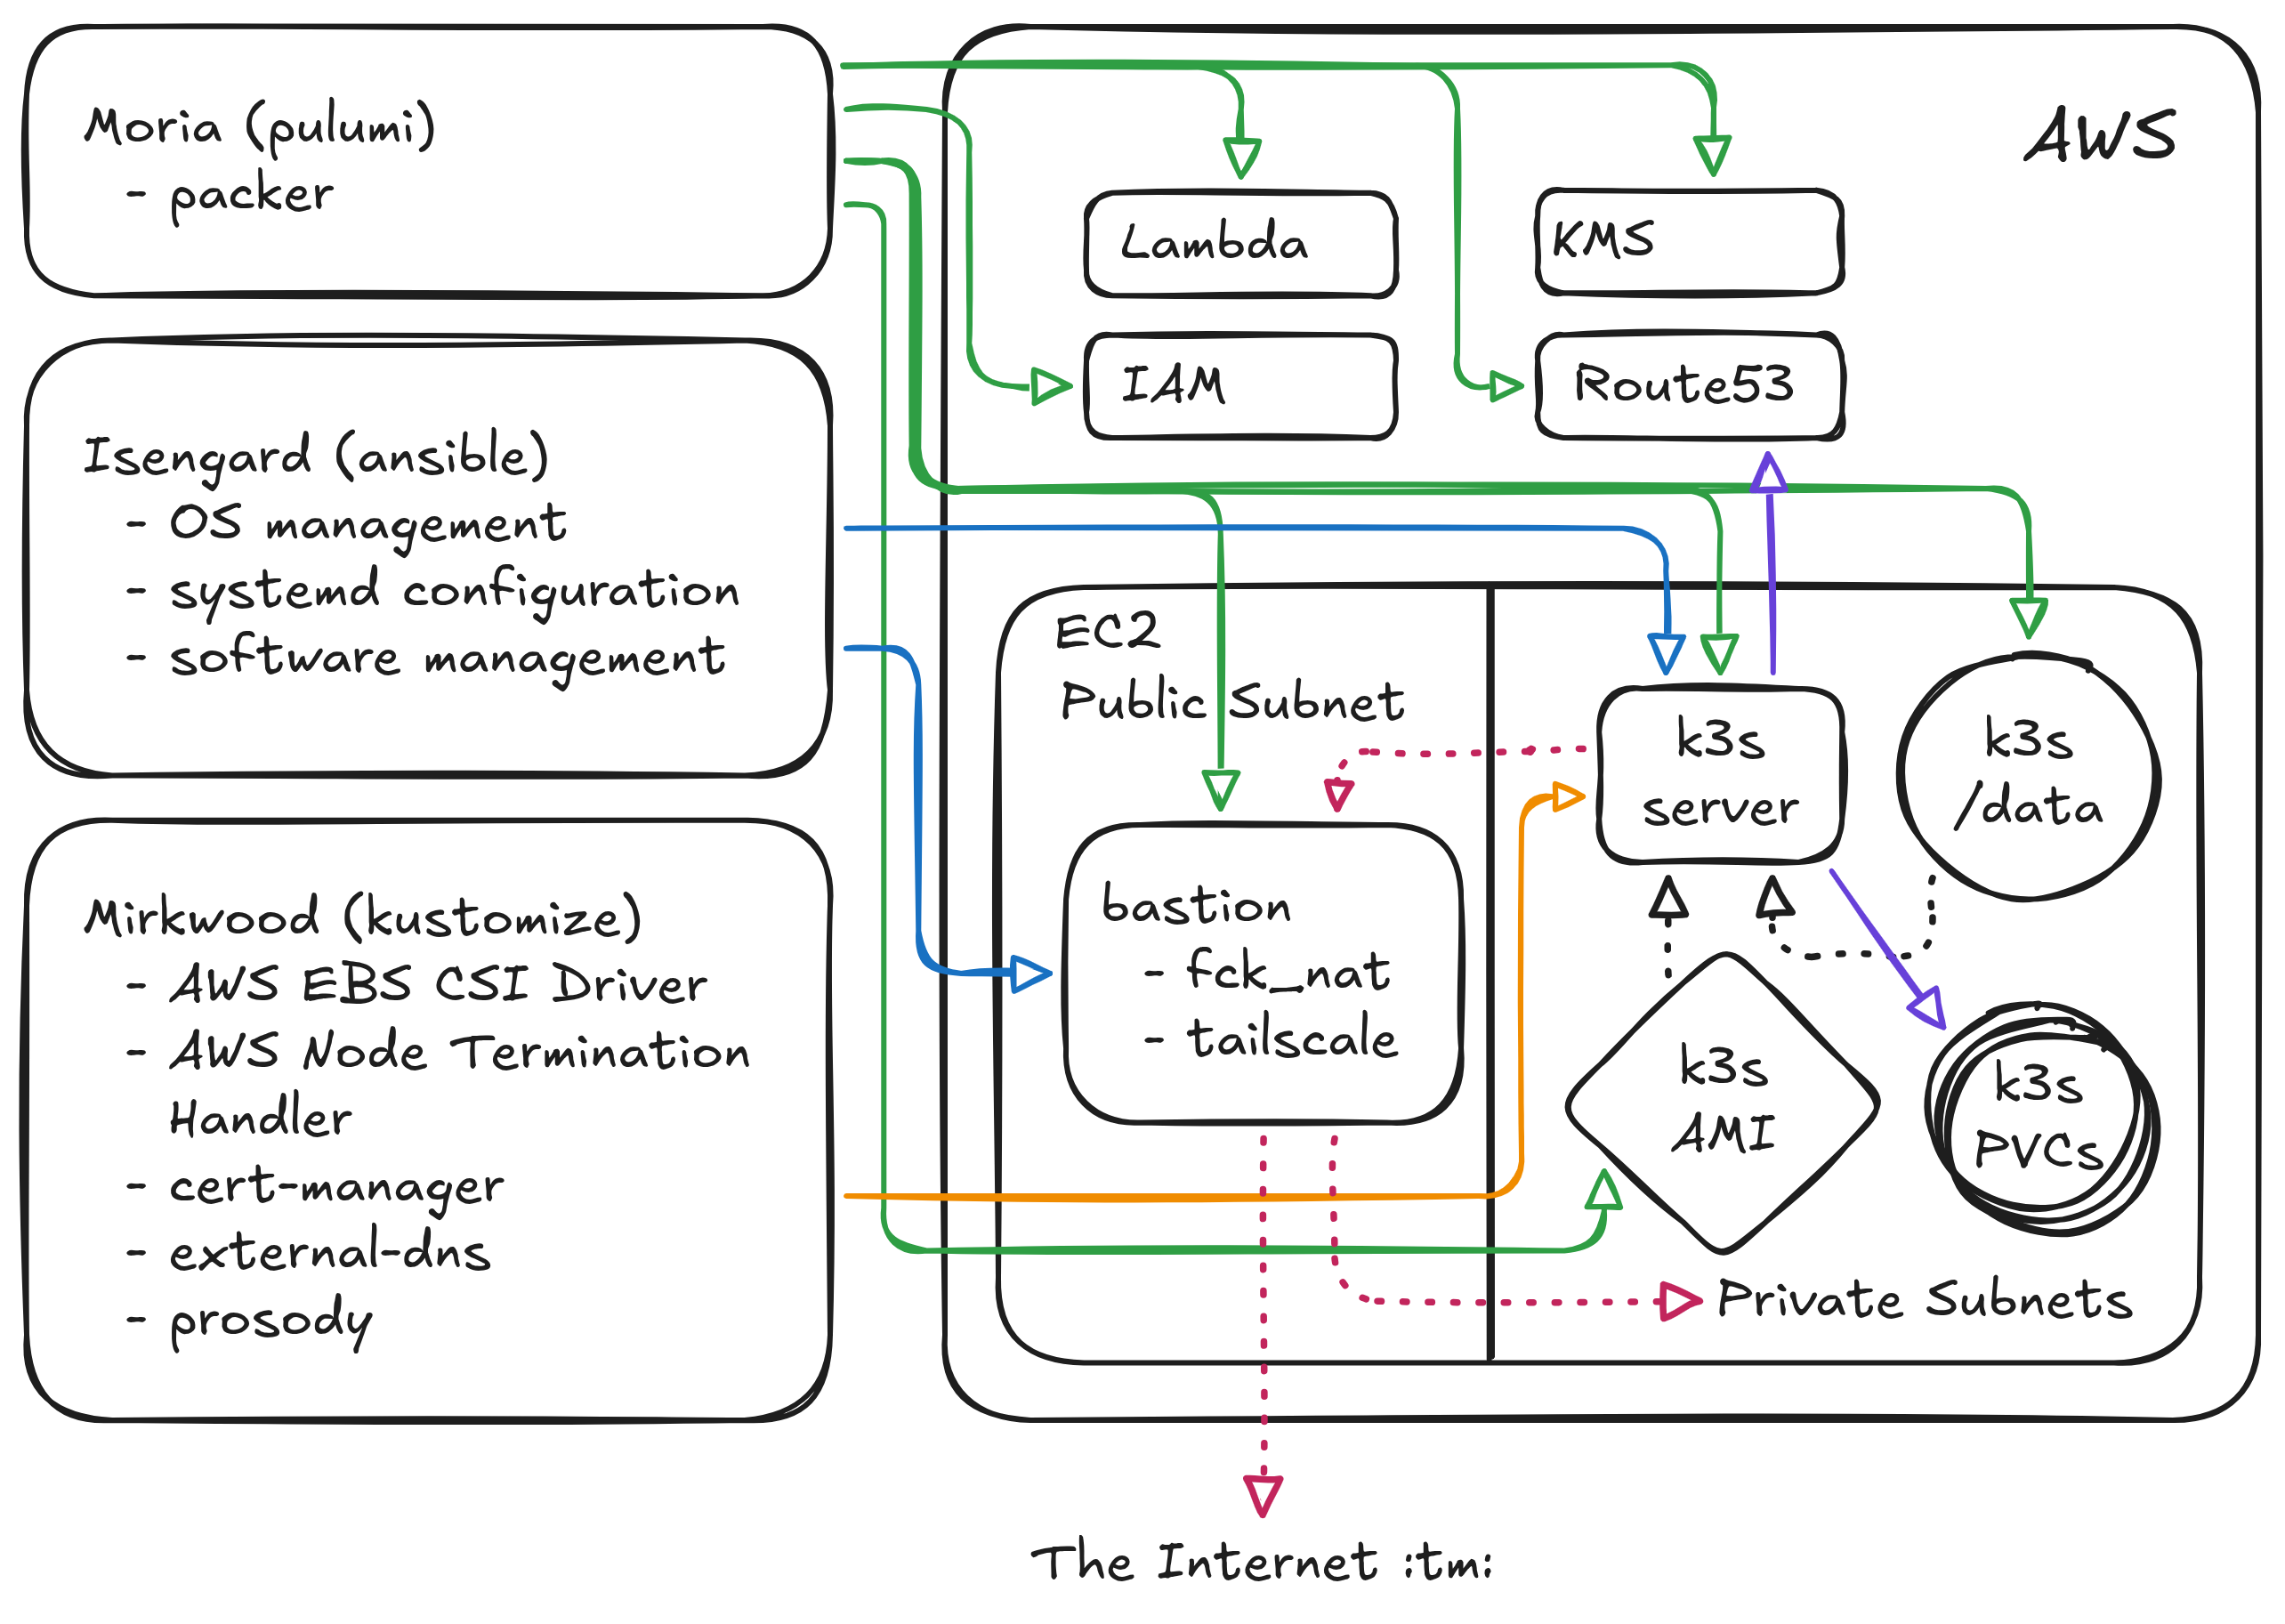
In my last blog post I explained that I have two repos named after famous locations from Lord of the Rings: Moria handles my “infrastructure as code” and Isengard is my server configuration management repo. Since that post, I’ve added a third git repo, Mirkwood, which contains all of my Kubernetes manifests5. You can see in the above diagram how each of these repos interact with components in AWS, shown by the colored solid arrows (green is moria, blue is isengard, orange is mirkwood, and the dashed lines indicate physical hardware connections or network connections); feel free to refer back to that diagram as we continue.
Moria
My last post did a pretty good job of covering the basic AWS infrastructure setup, so I’ll just quickly recap it here. In Moria, we use Pulumi to create the following AWS resources:
- A single bare EC2 node as an SSH proxy/bastion host/NAT gateway into my VPC.
- A single-node AutoScaling Group (ASG) which contains the k3s server node, registered as a spot instance.
- A persistent EBS volume which is auto-attached to the k3s server node on first boot (via a systemd service), which serves as the data volume for k3s.
- An internal zone in Route53 which I can use to store a DNS A record pointing to the k3s server.
- An AWS Lambda function, run as an ASG Lifecycle Hook which updates the A record whenever the k3s server is terminated and recreated.
Since the first post, I’ve had to add a number of other AWS resources as well into Moria to support various tooling further down the stack. XMPP requires TLS these days, which means I need a certificate; I considered whether to use the CA that I set up earlier in the year for this purpose, but those certificates are for a very different purpose than what I want now. I also considered whether to create a second CA for “internal services” but that also didn’t feel like a good approach. Fortunately, Let’s Encrypt is a thing; I’ve been using it for a long time for my personal website, and it has good integrations with Kubernetes, so this felt like the right approach.
Certificates need to be signed for a particular domain, however, and Let’s Encrypt needs to know that you own the domain that it’s signing certificates for. But my Kubernetes cluster is inside a private VPC that Let’s Encrypt knows nothing about! So this means I need to use Moria to add
- Two more hosted zones67 into my infrastructure; a public zone that Let’s Encrypt can use to verify ownership, and a private zone that will host the A records for my XMPP server. Note that we don’t actually configure those A records with Moria, however, because the IP address of Prosody can change.
I also didn’t talk about this at all in the last post8, but Moria also manages
- All of the AWS IAM (Identity and Access Management) permissions for this configuration.
- An encryption key in AWS KMS (Key Management Service) to help with secure secret storage.
IAM permissions are some of the most arcane and convoluted things I have ever had to work with, but essentially every component above requires a corresponding IAM policy that enables it to perform its task. The proper, most secure way of managing these permissions involves things like short-lived temporary credentials and OIDC and JWT and a whole bunch of other ugly acronyms, but frankly that stuff gives me heartburn every time I look at it, so for right now I just have a bunch of “service account” IAM users with static credentials configured in Moria. This is marginally less-secure, but I make it easy in Moria to rotate the credentials, and try to keep “what they can access” scoped as narrowly as possible. Someday in the future when I can afford to hire an infrastructure security engineer, I’ll make their first task to rip out all the service account users and replace it with the OIDC thing9.
I’ll lastly mention one note about the single-node spot instance: previously I had configured my ASG to launch a
t3a.medium, which uses an AMD processor, has 2 CPUs, and 4GB of RAM. My expectation was that, since this is a
(relatively) small instance type, it would have pretty high availability, since AWS can probably bin-pack that
more-or-less anywhere. That expectation was extremely incorrect; the k3s server node was getting disrupted between 5
and 10 times a day. Since then, I’ve expanded to allowing any of t3a.medium, t3.medium, t3a.large, or t3.large
spot instance types10, and using the “price capacity optimized” allocation strategy: this essentially tells AWS “pick
an instance type that is relatively cheap, but also is relatively unlikely to get interrupted”. Since I made that
change, I’ve been running a t3.medium spot instance for the last 3 days with no interruptions!
Isengard
In the last post, I gave an extremely high-level overview of my Isengard (Ansible) configuration management setup. Just as Pulumi or Terraform let you define AWS resources as code, Ansible lets you define software resources as code. In Ansible, you write all of your software configuration using a combination of YAML files and Jinja templates. These configuration steps are bundles into “roles” which are then rolled up into “playbooks”. The idea is that a server can have multiple roles, each of which has its own software and configuration installed, and the playbook is what tells Ansible which roles should be applied to which hosts.
In Isengard, we have three playbooks:
- The SimKube playbook: this is used to quickly and repeatably create SimKube environments. It’s also what’s powering our SimKube AMI and Github Action Runners, which I’ve been teasing in several posts, but will be getting its own blog post very soon now. So I won’t say anything further about this.
- The bastion playbook: this playbook manages the “entry point” into our private VPC.
- The k3s server node playbook, (also used to generate the AMI that packer builds for the k3s root volume).
In the previous post, I mentioned that I was using SSH tunneling through this bastion host, but that has since changed. I configured Tailscale, and I have no other words for it beyond “freaking magical.” I understand (somewhat, at a high level) how Tailscale works, but the experience has been so unbelievably good that I wish I’d done this years ago. Everything Just Works; I now have my bastion host configured to forward both DNS lookups into my private VPC, as well as to expose the internal routing tables from my VPC to any other client in the tailnet. It really is magical, there’s just no other way to describe it.
I am also running the fck_nat NAT gateway on my bastion node, to allow
everything inside the VPC to talk to The Internet :tm:. AWS does actually provide a native/built-in solution for
this, but it’s frankly hard to describe it as anything other than price gouging. A single NAT gateway
instance costs $30/month just to exist, and then they charge you on top of that for all of the traffic that goes
through the NAT! For comparison, I’m running fck_nat on a t4g.nano, which works just fine and costs me $3/month.
On the k3s server node, I am obviously using Ansible to install k3s, kubectl, and other supporting tools. I also configure the k3s systemd service here. This is what my k3s config looks like:
---
disable-helm-controller: true
disable-network-policy: true
tls-san: "k3s-server-0.uswest2.acrl.dev"
secrets-encryption: true
I disable helm because, ew gross. I disable the network policy controller because I don’t care about network policies,
and that controller expects a stable IP address which we obviously don’t have. The tls-san block gives a stable
domain name to issue the Kubernetes certificates for11, and the secrets encryption line enables AES at-rest
encryption for Kubernetes Secret objects.
For a brief period in time I also specified a stable Kubernetes node name in this config, but that ended up causing more problems than it solved: whenever the node was interrupted/restarted, it would remember all of the state of the node from before it was interrupted, which led to some extremely weird “stale state” issues. More on this later.
For what are probably “premature optimization” reasons, this config file is not baked in the k3s AMI, but instead is
generated as an ExecStartPre script in systemd; the script looks up the tls-san name from a tag on the EC2 instance,
which allows me to dynamically detect the hostname and potentially run more of these clusters in the future.
There is also an ExecStartPost k3s systemd hook which is configured by Isengard that does the following:
- Applies the EBS CSI Driver “not-ready” taint to the node (if this doesn’t mean anything to you yet, don’t worry, just keep reading).
- Cleans up any Node resources that are left over from when the spot instance was restarted.
The latter point is necessary because Kubernetes doesn’t actually ever delete nodes that are stored in its database,
it just lists them as NotReady in perpetuity. This isn’t really a problem, except that it looks ugly and takes up
space. If we were not using k3s, we would configure the cloud-controller-manager
to monitor the state of our AWS nodes and delete the ones from the Kubernetes database that don’t exist anymore; but k3s
ships with its own, slimmed-down cloud controller manager that has some other nice features, and I didn’t want to
disable that. So instead I just stuffed the cleanup into this post-run hook.
Mirkwood
Whew! We’re almost done here! We’ve got one last git repo to cover before we can have a working messaging app! Mirkwood contains all of my Kubernetes manifests, and it uses kustomize to provide the configuration management tooling12.
There are (currently) five applications running on my cluster:
- The AWS EBS CSI driver
- The AWS node termination handler
- cert-manager
- The external-dns operator
- And, lastly, Prosody itself, aka, the thing we’ve been trying to run this whole damn time.
The EBS CSI driver watches for Kubernetes Persistent Volume Claims and handle the creation, deletion, mounting, and unmounting of those block devices into Kubernetes pods. This is necessary so that my XMPP/Prosody pod can have persistent data across pod restarts. The EBS CSI driver must be running before any pods that request PVCs, so the CSI driver pod tolerates the taint that we created as part of the k3s configuration, and once it’s running and healthy it removes the taint so that other pods can schedule.
The node termination handler watches for spot interruption warnings (which AWS provides with a 2-minute time window) and triggers pod and node cleanup ahead of the interruption. This is necessary so that the EBS CSI driver can actually cleanly unmount the EBS volume before all the hardware is rudely yanked out from underneath it13.
Cert-manager, as we’ve discussed, is responsible for talking to Let’s Encrypt and getting certificates for my XMPP
server. It’s operating using the DNS-01 challenge mode, wherein the Let’s Encrypt issuer creates a challenge, and then
cert-manager creates a TXT record in my public acrl.dev hosted zone to prove that yes, in fact, I do own the zone.
Cert-manager then stores the certificate as a secret, which gets injected into the Prosody pod. It also automagically
handles getting new certificates ahead of the expiry date, which is pretty slick14! I’m a big fan of cert-manger.
Lastly, external-dns handles setting the DNS entry for my Prosody pod in my private acrl.dev hosted zone. The details
here are a little subtle: we create a Kubernetes LoadBalancer Service15, which normally would be handled by the
cloud controller manager to create a network load balancer resource in AWS. But that stuff’s expensive! We don’t wanna
run no network load balancer here. So instead, we use the builtin ServiceLB controller
in k3s, which more-or-less just exposes the right ports on the host where the pod is running via iptables rules. The
external-dns controller just looks up the IP address of the Prosody Service and writes that as an A record into Route53.
And now we (finally!) have everything we need in order to run our single Kubernetes pod. The Prosody pod requests a 5GB persistent volume to store all of its data, grabs a certificate from cert-manager, uses a ConfigMap to inject all the Prosody configuration, and runs as a single-pod Deployment. And, it all works!
Putting all the pieces together
There’s two bits that I didn’t cover in the above descriptions, which are a) automation and tooling, and b) secrets management. While the details are slightly different for each of my three repos, the high-level bits are the same. For automation and tooling, we use just, which I have increasingly fallen in love with over the last few years. I have justfiles in (almost) every repo, and any time there’s a complicated command that I need to remember, I drop it into the justfile. So if I needed to recreate this entire setup tomorrow from scratch it would be three commands16:
~moria > just apply
~isengard > just apply
~mirkwood > just apply
Not quite the one command I started off with in my initial goals, but honestly it’s pretty good imo. I also have GitHub
Actions configured in each of these repos17 to automatically run the above just commands whenever code is changed
(or, in the case of moria and isengard, on a periodic schedule to rebuild the AMIs and update the running hosts).
On the secrets management front, each of the four systems (moria, isengard, mirkwood, and k3s) have slightly different
methods for dealing with them. Any secret data is stored encrypted at rest, and the user interface is more-or-less the
same for each, it’s just the backend that changes. Moria uses Pulumi secrets, which are stored encrypted (using local
credentials) in the Pulumi state file in S3. Isengard uses Ansible secrets, which are stored encrypted (using local
credentials) in the Git repo itself. Mirkwood uses SOPS to store sensitive data in the Git repo
itself, this time encrypted the AWS KMS key that we set up with Moria18. To make each of these three systems easier
to work with, I have just targets configured to read or write encrypted data.
So that’s it! After several months of nights-and-weekends work, I now have a usable Kubernetes cluster that is running a single XMPP server in a somewhat reliable fashion, all for about $50/month of AWS bills. Is it cheaper than Slack? No. Is it a better user experience than Slack? Also no. Did I have fun? Lmao, nope, this was annoying as all hell to get configured. Was all the time I spent on this worthwhile, when I could have been using it to make SimKube better? Well… I think you know where this is going.
Anyways, hopefully this 4000-word guide (of sorts) might be useful to someone else down the line who is seeking to embark on a similar endeavour. Next time we’ll be returning to our regularly-scheduled SimKube content!
As always, thanks for reading.
~drmorr
-
My words, not his. ↩
-
How foolish we are in our youth. ↩
-
Although I hate the name. ↩
-
Critics might ask the question, “right for who?” and point out that some of the patterns I’m following are used at giant corporations with entire teams to support them and make sure things don’t go off the rails, and that I probably ought to be spending less time copying Google and more time hacking on SimKube. My response to that is, I’m not copying Google, we don’t do monorepos or Bazel here. Also, if you don’t like how I do things you’re free to go start your own company and do things your way instead. ↩
-
I strongly debated whether to call this repo “Mordor”, but that just didn’t feel right to me. YAML is kinda gross and there’s a lot of it, sure, but it’s not, like, the root of everything evil that is systematically trying to destroy every last bit of beauty and goodness in the world. It’s more like, you know, just a dark forest with lots of giant spiders. ↩
-
As an aside, I spent quite a while trying to figure out what domain name to use for these hosted zones; I wanted something that would be easy to distinguish from my “public” domains, namely
appliedcomputing.ioandsimkube.dev. I could use a subdomain and do something likeinternal.appliedcomputing.iobut that is already getting extremely long, andxmpp.internal.appliedcomputing.iois even worse. So I decided it was time to buy a new domain name; I’m now the proud owner ofacrl.dev, which is solely used for internal ACRL services. If you ever see anacrl.devaddress in the wild, it means something has gone horribly wrong. ↩ -
I thought long and hard about whether to buy
acrl.wtfinstead ofacrl.devfor my internal domain name, but it was $50/year for what is essentially a throw-away domain and that felt like too much. ↩ -
Astute readers will notice that I did briefly mention IAM in the footnotes of the previous post. ↩
-
Please don’t hack me. ↩
-
The
t3.mediumandt3.largevariants use Intel processors instead of AMD, but are otherwise identical to thet3avariants. ↩ -
Always with the certificates, geez. ↩
-
I mentioned this on Mastodon last week, but the more I learn about Kustomize, the more I don’t understand why Helm is so popular. Kustomize does everything that Helm does, except better. And it’s built right in to
kubectl! The docs are significantly worse, though, which is probably a big part of the reason why it’s not used more widely. ↩ -
I mentioned earlier in the post that setting a stable node name for the k3s node caused problems down the line, well, this is one of those places: when the node termination handler activates, it cordons the node, preventing any new pods from scheduling on it. Then the old node goes away and the new node comes up, and k3s looks in its database to see that “oh huh this node is cordoned, better not let any pods schedule on it!” So this is how we ended up in the current state. As I’m writing this, it occurs to me that instead of having my k3s post-start systemd hook clean up the old nodes, I could instead have it just un-cordon the current node; but there were a number of other similar “stale state” issues that I was working around with the stable node name that I think the current solution is slightly better. We actually could still end up in a similar situation because AWS uses the node IP address as the hostname, and sometime it will re-use the same IP address for two subsequently-launched nodes; I’ve seen this happen for large-scale clusters, but I think in my single-node cluster this circumstance seem unlikely. ↩
-
There is a slight issue that I haven’t figured out how to resolve yet, which is that the Prosody process will need to restart/reload its configuration once it gets the new certificates, but that’s a problem for 90 days from now, at which point I will have forgotten all of the details about all of this and will therefore spend a day and a half trying to understand why my chat server isn’t working anymore. ↩
-
“Service” is probably the least-well-thought-out name in the entire Kubernetes ecosystem. Literally everyone uses “service” to refer to an application that is running out there somewhere in the ether. Kubernetes, however, uses “service” to mean very specifically “the networking configuration that allows other things to talk to the application. ↩
-
I am slightly lying here; I haven’t fully hooked up all the tooling in each of these repos to apply everything in a single command, so for isengard I would need to apply the bastion configuration and the k3s configuration separately. In mirkwood, I need to
just applyeach application separately. But don’t worry! I’m getting there. ↩ -
Also slightly lying here, I haven’t set up GitHub Actions for mirkwood yet. ↩
-
Eventually I’d like to get all three of these repos using KMS instead of relying on local credentials, but, well, there’s always more work to do, amirite? ↩